In today's digital school photography project I'll show how to take night HDR images and post-process them in Adobe Lightroom and Postmatix.
A year ago - taking a decent night photo sounded mission impossible for me, since I have acquired a DSLR camera a lot has changed, and I'm starting to feel being capable of creating even night HDR's now. Take a look on this tutorial: Practicing Photography: Doing Night Shots - Tbilisi By Night.
Although I don't like to spend a lot of time on post processing images, I must admit - post processing is very valuable science to master to make your photos look even better. Since there is post processing involved in HDR photography, I'll shoot in RAW mode just not to loose details of scene (as it might happen shooting in JPEG mode). Another important tool you will need to have - a sturdy tripod, because shooting at night involves long exposures, without a sturdy tripod your long exposures will be blurry. For post processing our HDR night images we are going to use Adobe Lightroom and Photomatix. Actually I have a basic tutorial on HDR photography for HDR Efex Pro , you can take a look on that article. Actually there is not much difference on using HDR Efex Pro or Photomatix.
If you don't have a DSRL camera, that's OK, most point and shoot cameras might handle this task, alternatively check out TOP 13 DSLR cameras for beginners as of 2016
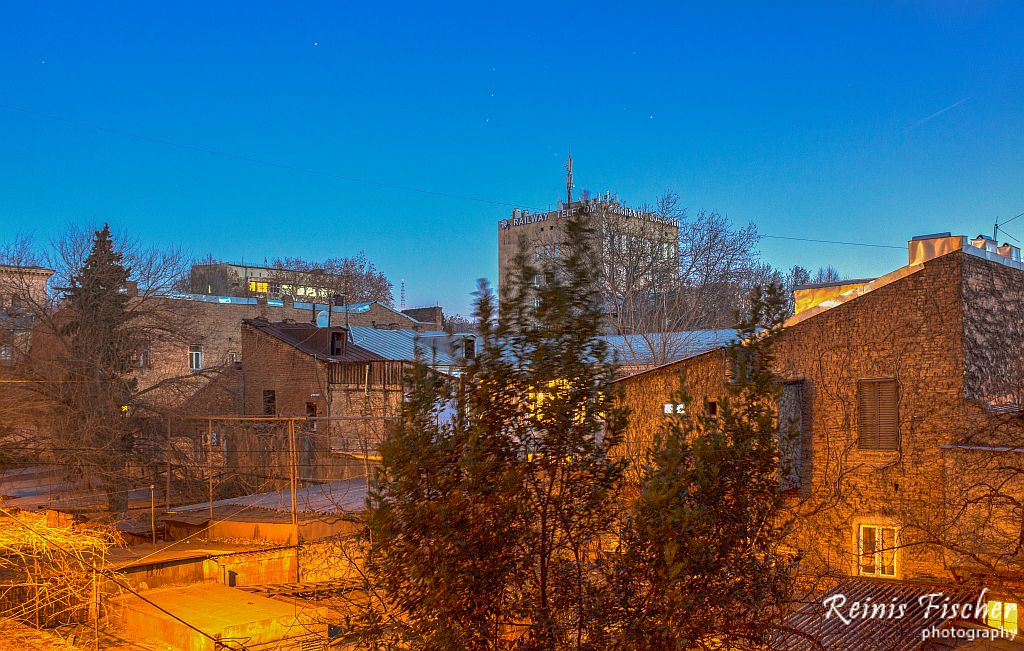
HDR Final Night image
HDR night image
I shot above image (s) from my Tbilisi apartments balcony (lately I'm photographing a lot from it, take a look how I captured fireworks from the same spot just few days ago).
Now speaking about Night HDR images, you should avoid to photography moving elements like trees, since we are going to use long exposure shots, the chances that wind will move trees are huge. So did happened in above image. I could use deghosting, but still if there is trees and wind, our best shot will be a little bit blurry, just because it was shot in longer exposure. I will probably do another night HDR image photography with some wider landscape.
The bonus track: If you will look carefully in above image you will notice there is Ursa Major also known as the Great Bear just above the Railway Telecom building.
For above image I decided to shoot in Manual mode, aperture 5.6 and ISO 100. Since in HDR mode a bracketing is involved meaning each shot will be in different exposure time, I experimented with 3.2, 5 and 6 second basic exposure, which got me the longest exposure to be just 20 second long. Since most DSLR cameras can go up to 30 second long exposure without involving Bulb mode (and this is what I didn't wanted to do, since I don't have a shutter release cable) 8 seconds probably are the most you should set as your base exposure.
You should experiment on your own with aperture and exposure.
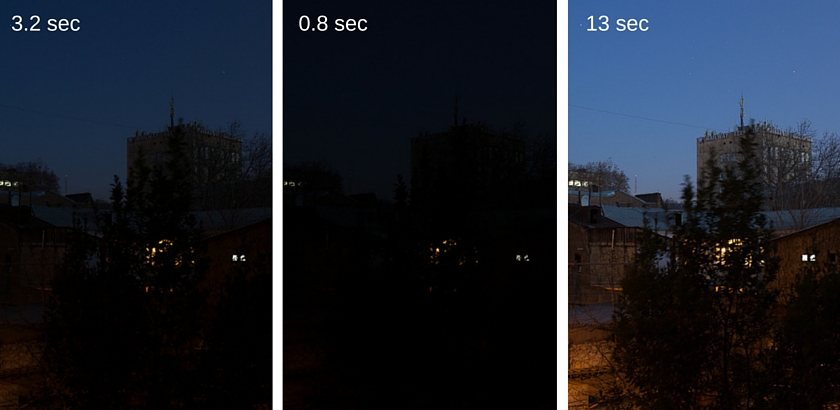
Three different exposures for night HDR photography
As you can see from the longest (13 sec) exposure, trees are moving and there is nothing much I could do to make them not.
After photo shooting make sure you are importing your pictures to Adobe Lightroom, you can fix some details here. Although I prefer to load them at first in Adobe Lightroom, them straight export to Photomatix, and let the program do the magic, and then when imported back I'm using some lens correction from Adobe Lightroom, adding some warmer colors e.t.c. once you are pleased with the result, just export your photo and... leave me a comment, how did it went?!